That’s right.. I made what some may call the best ever burger, homemade! in addition… I cooked on a grill that I actually found by the dumpster, still in working condition!
Take a look at this beauty… recipe to follow:

Denver’s best kept recipes for feeding yourself and family during COVID-19!!
That’s right.. I made what some may call the best ever burger, homemade! in addition… I cooked on a grill that I actually found by the dumpster, still in working condition!
Take a look at this beauty… recipe to follow:
Hello my lovelies!!
My sincere apologies for the delay, since my last post. I took some time to celebrate our nations birthday but am happy to be back with you all!! Here is a sneak peak of some of the concoxtions I have been up to, while away…
We fired up the smoker on the 4th and here is what we got:

Smoked wings!!!!! Yuummmm!!!
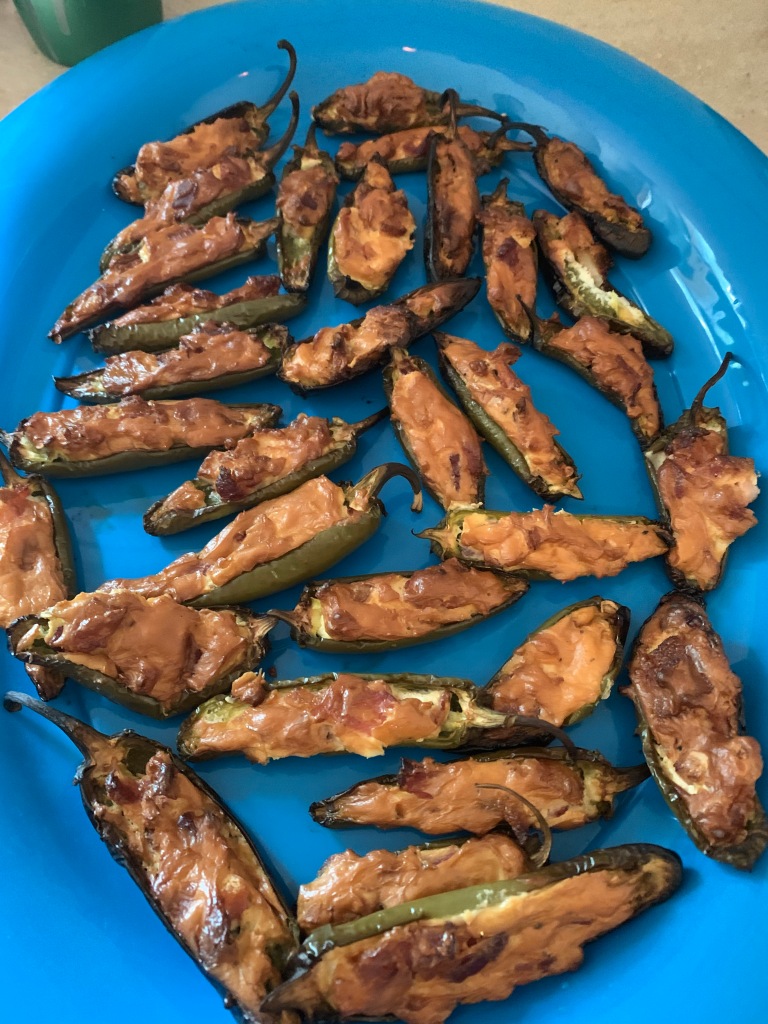
Smoked jalapeno poppers!!!!! These are fire people, let me tell you!!!
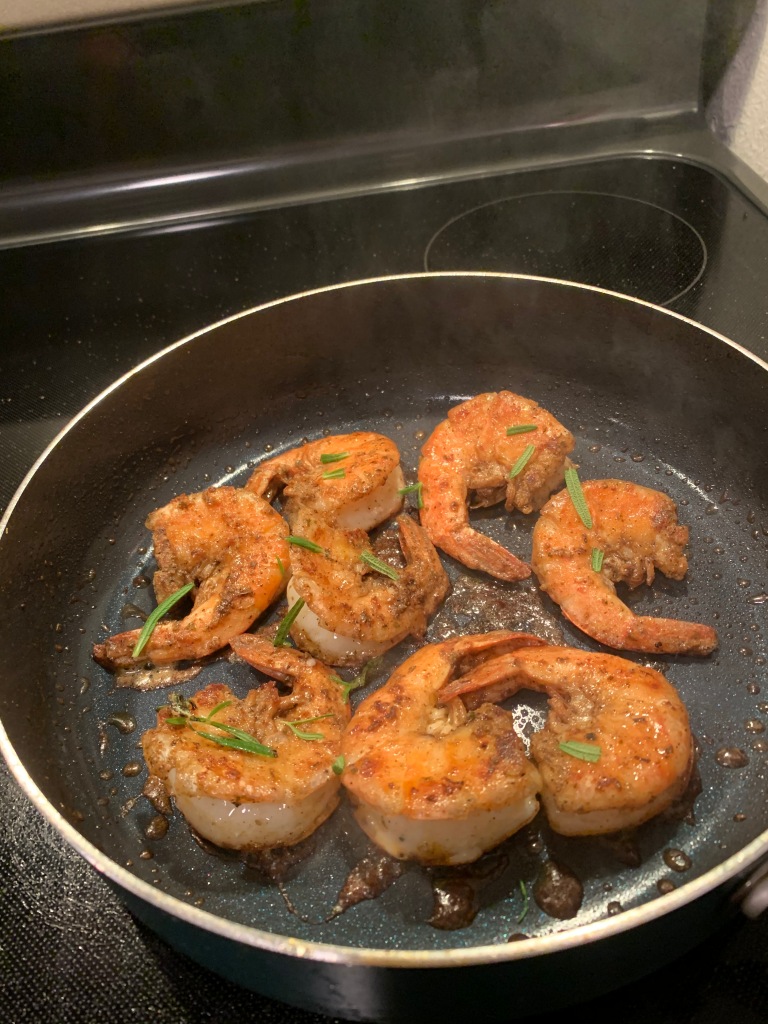
Sauteed shrimp with rosemary garnish! These little guys will make you feel almost as if you are right on the beach!

Hey Everyone!!
I have an amazing recipe for you today… smoked baby back ribs!!! As you can see from the pictures, these beauties emulate perfection that even the best in the BBQ biz will be drooling over this mouth-watering creation!
Here are the ingredients you’ll need:
BBQ dry rub recipe:
Mix all ingredients together and set aside.
Spicy BBQ recipe:
Mix all ingredients in blender until sauce is smooth, leave out to settle.
Directions for smoking ribs:
step 1) rub mustard all over the ribs on both sides. Once finished rubbing mustard, add the Worcestershire sauce on meat on both sides. Add healthy amount of rub on both sides and let side for 2-3 hours before smoking.
step 2) soak wood (any flavor is fine but I prefer apple or cherry wood) for at least an hour. Set smoker temp at 250-275 degrees.
step 3) place ribs directly on rack, at least 1 feet from the heat source, of your smoker. Smoke ribs for 5-6 hours depending on their thickness and temp outside during smoking process.
step 4) remove rib from rack and let set for 20 min before eating. Dip in BBQ sauce and enjoy!!
Thanks guys, I really hope you enjoy these ribs and more recipes to come!!


Hey everyone! So sorry again for the delay in the homemade pizza recipe! Of ya read my last post then you’ll know I had a little snafu with my dough lol but still came out great!! Let’s get started shall we…

So first things first… the dough! Here is the recipe I used and I want you guys to experiment with it and let me know how it works…
Equipment for pizza:
• glass bowl
• measuring spoons
• measuring cups
• rolling pin
• pizza stone
Ingredients needed for making the sauce:
• 1 (6oz) can tomato paste
• 1 (14.5oz) can fire roasted crushed tomatoes
• 1 1/2 cup h2O
• 1/3 cup extra virgin olive oil
• 4 garlic cloves (chopped)
• salt & pepper to taste
• 1 tbsp oregano
1 tsp cayenne pepper
• 1 tbsp Thai basil (from my garden)
• 1 tbsp fresh rosemary (from my garden)
1 tbsp fresh thyme (from my garden)
Directions for sauce:
This sauce does not need to be cooked or heated up. Simply mix all ingredients together and let sit in fridge for 4-5 hours, to blend the flavors.
Toppings:
• 1 lb lean ground beef
• 1 cup chopped red onion
• 1 cup shredded cheddar cheese
• 1/4 cup parmesan cheese
• 1 tbsp chopped cilantro (for garnish)
Ingredients for dough:
• 1 cup warm h2o (water haha) warm to the touch
• 1 tbs sugar
• 1 tbs active dry yeast
• 1 tbs olive oil
• 1 tbs salt
• 1 tbs black pepper
• 1 tbs garlic salt
• 2-1/2 cups all purpose flour
Directions for dough:
Step 1) start by proofing the yeast, mix it in glass bowl with sugar and water. Mix until foamy/bubbly (about 5 min)
Step 2) once the yeast is proofed, add olive oil, salt, pepper, flour (2 cups) and mix. It should become a sticky ball, add more flour as needed. Then transfer to a floured surface and knees five min or until smooth ball forms.
Step 3) knead until smooth and sticky and form pizza dough, adding flour as you form it. Note: for a bigger dough, let proof on counter for an hour before kneading.
Step 4) next it’s time for the pizza and toppings. I went with ground beef as it gives a good salty flavor added to the cheese and raw onions… makes for an amazing pie!
Step 5) cook ground beef over med heat on skillet for about 10 min or until brown. Season with salt and pepper to taste.
Step 6) making your pie! Add sauce then a little cheese then ground beef, onion, and remaining cheese. Top with oregano and put in oven for 15-20 min at 425 degrees depending on if you want crispy crust or not.
Step 7) take out pizza and let rest on cutting board, add the cilantro as garnish and enjoy that thing!!!
Thanks everyone and please leave comments or questions if you make this recipe! Also, if anyone comments or emails me about my hot sauce… I’ll gladly send a free sample bottle to you to try!
Hey guys! So sorry for the delay in getting the pizza recipe and pics over last night… little mishap in the kitchen…. lol
In all honesty I’ve never made homemade pizza dough before, so this was quite the experience lol
Needless to say, after you see the pics… you’ll understand! She isn’t pretty but sure tasting amazing with all the freshest ingredients I could find…. including some from my home garden!
Pics and recipe coming up shortly!
Happy Taco Tuesday everyone! Below is a simple and quick at home recipe for blackened chicken street tacos. I will give you step by step instructions on this recipe and pictures of the finished product I make at home!

Below is the recipe for blackened chicken street tacos. Ingredients you’ll need:
• 1lb skinless boneless chicken thighs
• 1/4 cup Worcestershire sauce
• 3-4 garlic cloves
• 1 red onion
• 2 tbsp canola oil
• 1 lime
• corn street taco tortillas
• 1/4 cup feta cheese
• 1 tbsp chopped fresh cilantro
RUB FOR MARINADE:
• 1tsp salt & pepper
• 1 tsp cayenne pepper
• 2 tsp Old Bay
• 1 tsp oregano
• 1/2 tsp sugar
• 1/2 tsp garlic salt
• 1-2 pinches chopped fresh rosemary
Mix all ingredients in sandwich bag and shake well, set aside.
Step 1) place chicken in freezer bag with Worcestershire sauce and shake well, put in fridge for 2-4 hours before cooking. Remove from bag and set on plate, do NOT pat dry.
Step 2) take rub mix and sprinkle over chicken on both sides and set out on counter.
Step 3) in medium frying pan, heat 1tsp oil and place chicken in pan. Heat on medium-high heat for 3-4 min per side. Once both sides are golden brown, lower heat to medium and add 1/4 cup water to pan and cover for 10 min, flipping sides at 5 min. Remove chicken from pan leaving oil liquid behind and wrap chicken in foil, set aside.
Step 4) heat pan used for chicken with liquid still in it to medium and toss in chopped onion. Cook down for 3-5min. Once done set aside.
Step 5) heat pan on medium-high heat with just a dash of oil. Heat tortillas until golden brown, only heat on one side.
Step 6) fine chop cilantro and crumble feta for garnish.
Step 7) plate tortillas (2 per taco) put chicken down first, then sautéed onions, and then cilantro and feta on top. Add your favorite salsa or hot sauce… Black Dog Hot Sauce for sale as well!
Step 8) EAT AND ENJOY!!!
That’s it for the first recipe from Chef Steve and the Surviving COVID Recipes! Please leave comments if you make the dish or have any questions! Tomorrow will be homemade pizza!! Stay tuned!!
St
I want to start by telling my story and why I have started this blog, before my first recipe is out for you guys.

I have a passion for cooking that can only be measured by the tone and love I put into my food! For about 8 years I have worked anywhere from restaurants, Whole Foods kitchens, to owning my own food truck for several years.
For the past couple years however, I was working in sales and not cooking at all. While this job allowed me the opportunity for financial freedom, stability, and traveling the country… I always knew in my heart I was destined to cook!!
During this time in the sales role I realized that I needed to figure out what I really wanted to do and how I could back into cooking again and achieve my goal of having my own restaurant one day! Then, COVID-19 happened and I was laid off from that job and the world changed as we know it! Masks everywhere, restaurants closing their doors for good, and fear of travel to see friends and loved ones.
The silver lining though is that being laid off really showed me I need to do what I was born to do and where my passion really lyes… in the kitchen. The therapeutic elements that cooking brings to my life along with creativity and personality on a plate, cannot be explained!! It’s just a feeling you get and it becomes who you are and who you know you should be in life! Some struggle to find themselves and their identity in this world and mine is in the kitchen and it’s because of the love and support of my friends and family, that I get this opportunity to share my passion through food, with all of you!
I look forward to embarking on this journey with all of you! Recipe coming shortly!!
Hey everyone! Thanks for hanging in there and waiting for the launch of my blog!
Shortly I will be giving you step by step directions on one of my favorite dishes! I hope you all enjoy it and get some great opportunities to try it at home!
We are almost there, my friends! Tomorrow will mark the first day and first recipe for my surviving COVID recipe blog! Thanks for all the support to this point and I can’t wait to share with you all tomorrow and beyond!
Hello my friends!! I wanted to give you all a heads up that starting this Monday, the 22nd of June, I will officially kick off “Surviving COVID Recipes”! Where, I will feature a dish each day using fresh herbs and veggies (grown by yours truly) and the best local meats I can find in Denver… open to suggestions!! I will give you step by step directions and recipes for you to make these dishes at home for yourselves and families!
Looking forward to this launch and sharing my experience with you all!! Stay tuned for more updates and be excited for Monday… I know I am!! 😁😆😁
